
Table of Contents
System Optionen - Tab |Interfaces|
On system options tab |Interfaces|, pre-settings regarding image data import and export, archiving of patient-related external documents and communication via info server can be configured.

[Click on tab to switch to related topic]
Panel Import
| Button | Settings |
|---|---|
| Digital Xray... | Interface configuration for digital Xray systems |
| Digital Camera... | Interface configuration for camera remote control |
| VDDS-Images | Interface configuration for VDDS (IMS) systems |
| CT/PACS/KIS | Interface configuration for clinical IMS |
| Face Scanner | Interface configuration for 3D face scanners |
| Desktop - i/o Scanner | Interface configuration for 3D model and i/o scanners |
| Checkbox | Settings |
|---|---|
| QuickCeph - Support | QuickCeph import converter activation |
| Allow Master Data Import via DICOM | DICOM - master data import activation |
| Local copy for slow image sources (network, optical storage) | Workaround for import from slow data drives |
Panel Export
| Buttons | Settings |
|---|---|
| 3D Print | Configuration direct 3D print export (printer, service providers) |
| Directories | Configuration 3D export folder (location, naming) |
Panel Archiving
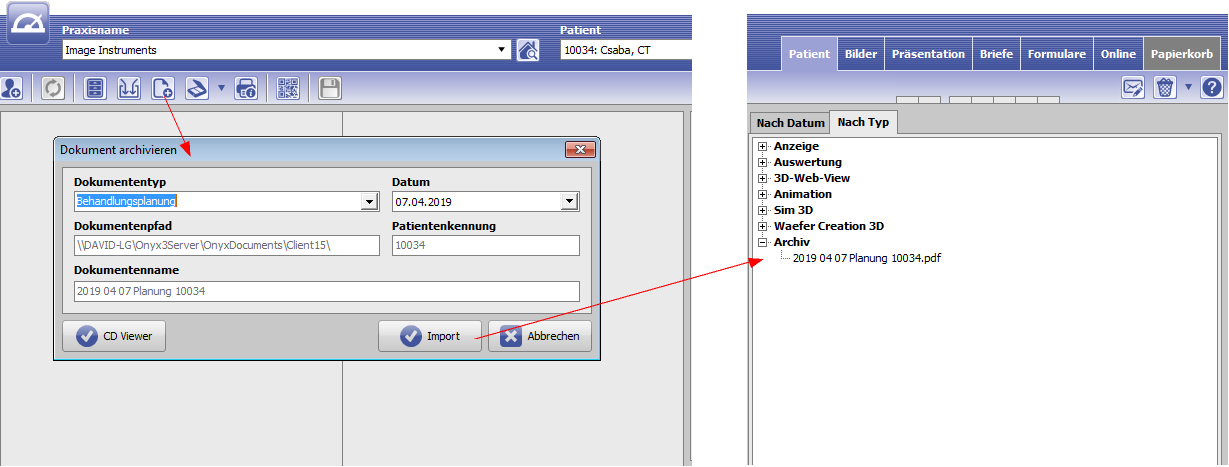
For each patient, external files can be stored in a pre-defined archive subfolder. The patient subfolders in the archive directory can be named either with the patient ID (recommended) or the combination name_first name_ID when creating the first file.
It is also recommended to enter the identical archive directory (standard) for all clients via its UNC address, so that all workstations can access the same data.
The files stored in the archive must be assigned a pre-defined document type during import, which is also used to name the file in the archive folder.
In addition to files, patient CDs with image viewers can be stored in the archive. If a third-party program is to be used as a viewer to open the CD data, this must also be assigned here.
The archiving data is displayed and opened in the main window document tree on tab |Patient|.
Panel HTTP Info Server
Here, the HTTP communication to the local OnyxCeph client application can be activated and configured:
- Activation
- TCP/IP port
- LAN/WAN