
Table of Contents
Simple Image Import Interface (By Bookmark)
Note:
If 2D/3D image data have to be taken over from an imaging system that does not provide an interface for this purpose, then the images to be transferred should be exported to a shared network folder in subdirectories named with the cross-practice patient ID. OnyxCeph³™ can then preselect these folders for the current patient and offer them as bookmarks in the [Add Image] module.
OnyxCeph³™ supports the import of image files 2D and 3D to a belonging patient record by several import interfaces - general interaces (like VDDS/IMS, e.g.) as well as device specific ones (like Sirona/Slida, e.g.).
For each interface, specific settings have to be made on both sides of the communication to ensure the correct assignment of image data to patient record.
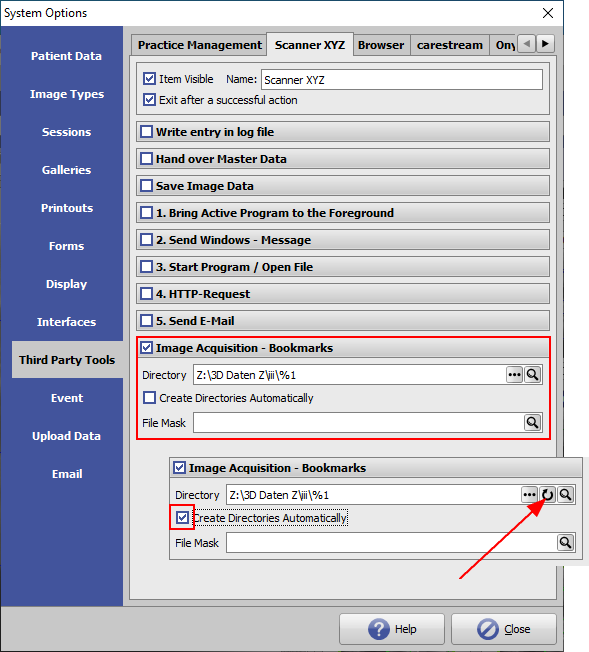
If such bi-directional interface is not available for a specific imaging system (e.g., for an i/o scanner), a simple but reliable alternative can be used by setting up a so-called Image Import Folder in System options on tab |Third Party Tools:
Imaging System
The image data stored for the patient is then imported into OnyxCeph³™ in the Add image module via the [Bookmark] button in the menu of the [Select image from directory] tab under the entry of the respective third-party program.

OnyxCeph³™
The import of the image data stored for the patient in OnyxCeph³™ takes place in the Add image module in the menu of the [Select image from directory] icon under the entry of the respective third-party program.

Settings
For the described type of image transfer, a third party program tab not yet occupied must be selected at the local workstation under System options|External programs. There, the menu item for image import is named accordingly and activated.
In the Image acquisition panel, the path for image transfer is selected and supplemented with the placeholder "%1" for the current patient ID. Other combinations of placeholders for mapping folder names can also be formed at this point if the imaging system generates corresponding constructs.
If the subfolders for the patients currently in OnyxCeph³™ are to be created in advance, then this can be done by activating the [Create directories] checkbox with the arrow key highlighted. By creating or resaving the patient data on tab |Patient|, the relevant patient subfolder will then be created automatically, if it does not already exist.
Hint:
If, in addition to the home client, scans to patients in third-party clients are also to be imported via bookmark to the scan folder, then it is recommended to insert the client number as an additional folder level:
Z:\3D Daten Z\iii\Px<FL|%F|4|0>\%1
This way, mixing of patient numbers from different practices can be avoided.